Sunday, December 29, 2013

Top 5 From 2013

Here are the top viewed Thrifty 31 Blog posts for 2013. Wishing you all a blessed year in 2014!!

http://leahjayewright.blogspot.com/2013/12/10-ways-to-love-your-husband.html


Homemade Kettle Corn


10 Inexpensive Fall Date Nights


10 Reason I Shop At ALDI


What would you like to see more posts about in 2014? Recipes, DIY decor, frugal living, sewing projects, faith and family? Feel free to give your input!

Thursday, December 26, 2013

Pine Cone Fire Starters

This year for Christmas I went with a camping theme for my husband. He had really wanted a cast iron tea kettle to take with us when we go so I decided to make a couple other camping essentials to go with it.


The first thing was a firewood carrier. This was the easiest project! I found a large black canvas tote at Jo Ann's. I simply cut down the sides of the bag and painted"firewood." on the front. Easy peasy!


The next project was pine cone fire starters. You could use some from your yard or store bought. First, get some wax or use an old candle. Make a double boiler to melt the wax. Fill the larger pot half way with water. Put a smaller glass or metal container inside the larger pot and the candle inside that. Turn heat on medium and let melt. This took awhile, so I would suggest trying to cut your candle in smaller pieces.


While this is melting, lay out some newspaper and put a sheet of wax paper on top of the newspaper.


Then you can use a candle wick or I used some cotton twine I had at home and wrap it around the pine cone, leaving a tail at the top to hold while dipping and to light when you are ready to use.


  Once all of the wax is melted, you can start dipping your pine cones into the wax. I used some tongs to dip them just to make sure I didn't burn myself. Dip a couple of times and then set on your wax paper to dry, about 30 minutes.


Remember the drawstring burlap bag I made awhile back? I decided to use it to hold these. My hubby loved them!


Wednesday, December 18, 2013

Vintage Ladder Christmas Tree

Remember this vintage ladder I showed during my fall home tour? 

http://leahjayewright.blogspot.com/2013/09/fall-decor.html

 
Now it's time to show you how I decorated it for Christmas!
I love the large vintage looking bulbs I picked up at Goodwill. I also now have a large burlap bow where the holly is in the picture, but forgot to take another picture of that.


You could easily use some strips of landscaping burlap or ribbon for garland, but I wanted to keep mine simple. This project cost $2.00 for the lights, but that's it. I love simple and inexpensive decor!

Monday, December 16, 2013

Leftover Ideas For All That Holiday Ham

We had our small group Christmas party yesterday and I made this easy crockpot ham and man was it delicious! I got lots of compliments on it so wanted to share the recipe with you all too! You can click HERE to view the original recipe.

I came home with lots of leftovers even though I gave some to others as well! I decided to get creative with meals for this week using our leftover ham. The first thing I made was ham and banana pepper pizza. Yum! I used this crust recipe and then just put some pizza sauce, mozzarella cheese and small pieces of ham and peppers on top. 


Here are some other ideas for your holiday ham leftovers.


Do you have any other great dishes you like to make with your leftovers? Feel free to share! 


Thursday, December 12, 2013

Monday, December 9, 2013

10 Ways to Give Back this Christmas Season

So often we get caught up in the hustle and bustle of the season that we forget the real reason we have Christmas in the first place, the birth of Jesus Christ. Not only did He perfectly give His time and energy and love to others while living on this earth, but gave His life so that whoever believes in him shall not perish but have eternal life. (John 3:16)

I have made a list of how you too can give back this Christmas season. These would all be great things to do with your little ones and get them thinking about others this time of year! 


1. Write letters or make cards to send to the soldiers. Don't forget to pray over each card and for who might reciece it. 

2. Thank the mailman. Leave a bag of candy or cookies with a little note in your mailbox for next time he delivers the mail. 

3.  Donate food or clothing items to your local pantry. Many pantries look for volunteers also. Think about giving your time as well.

4. Leave a dollar taped to the vending machine in a hospital for that worker or family member who might be having a rough day.


5. Donate some old toys. Have your children go through and donate a few to a child who might not get many or any presents at all this Christmas.

6.  Visit residents at a nursing home. Bring them cards or gifts, some games you can play with them, crafts to make or sing carols.

7. Shovel driveways. If it's for an elderly person or someone who is sick offer to do it for free. If someone wants to pay you donate your earrings to give to someone in need. 

8. Hide a couple dollar bills with a little note in the toy section at the dollar store. Can't you imagine a little child's face when they see this! 

9. Thank the fire and police department. Write thank you cards and bring something sweet to thank those who always keep you safe.

10. Look for houses displaying Jesus or a nativity scene as you drive around looking at Christmas lights. Have some nativity pictures colored with a note saying "Thank you for displaying the reason for the season" and leave it in their mailbox.

What other ways have you gotten your children involved in giving back?

Sunday, December 8, 2013

Snow Ice Cream Recipe

This weekend we had a big snow...like 10 inches to be exact. It was nice to be stuck at home for a bit and enjoy some fun family time. We relaxed, played games, went sledding, ventured out to see the Hunger Games and of course, made some snow ice cream!  


*Original recipe found on Pinterest*


***UPDATE*** - Add in a packet of hot cocoa powder to taste like a fudgecicle!


Enjoy a yummy bowl full before it melts!


Thursday, December 5, 2013

Homemade Dessert Pizza

Have you ever gone to a pizza place and had their yummy dessert pizza? Well let me tell you...this is even better than that! No kidding. My husband does not like any dessert except for cookies and he said several times that this recipe was his new favorite dessert! Must be good, huh! ;)


Original recipe from: Chef in Training


Ingredients


  • 1/4 cup cold butter (1/2 a stick) *Important that it is cold*
  • 1/4 cup sugar
  • 1/4 cup brown sugar
  • 1/4 tsp. cinnamon
  • dash of salt
  • 1/2 cup flour 
  • 1 can crescent rolls 
 GLAZE 
  • 1/2 cup powdered sugar 
  • 1 Tbsp. butter, softened
  • 1 tsp. vanilla
  • 1 Tbsp. milk 

Instructions

1. Preheat oven to 400 degrees F 

2. Cut in butter to sugars, cinnamon, salt and flour to form crumbs. 

3. On an ungreased cookie sheet, separate crescent roll dough into 8 triangles. Sprinkle crumbs on top. 

4. Bake at 400 degrees F for 8-12 minutes and let cool a couple of minutes.

5. To make glaze: Blend together all the glaze ingredients and drizzle over dessert pizza slices.

Tuesday, December 3, 2013

Rustic Christmas Home Tour

I've posted a couple of my Christmas decor ideas HERE and HERE. To see the rest, just scroll through the photos below.


http://leahjayewright.blogspot.com/2013/11/cookies-milk-for-santa.html 


Sunday, December 1, 2013

10 Ways to Love Your Husband

The next few weeks our church is doing a sermon series on the home. My husband and I also just returned from a marriage conference our church held in New Harmony, Indiana. It was so nice to have a little weekend getaway and to bring back some great ideas to continue bettering our marriage.

This all comes at a great time because we recently celebrated our two year anniversary. Over the past two years I have learned a lot about what it means to be Godly woman and wife and how I can continue loving my husband even better.


1. Respect Him (Ephesians 5:33)- This doesn't mean respect your husband when he deserves it. This means ALL THE TIME. Marriage is a cycle. Woman need love to show respect and men need respect to show love. Show your husband you respect him and get the cycle going. This doesn't mean make him think you agree with him when you don't, but communicate your thoughts or feelings in a respectful way. 

2. Leave Your Father & Mother (Genesis 2:24) - God calls us to leave our father and mother. In order to have a good marriage, you have to be able to leave well. This means when you have a problem, talk it out with your husband. When something in the house needs fixed, trust your husband to take care of it. Even though as little girls we look up to our daddy's to take care of us, when we marry our husbands they want to be the ones to take care of us. So let him. This is another way of showing him respect too.

3. Speak Words of Kindness (Proverbs 31:26) - I think the hardest thing to remember about this is not only speak words of kindness to him, but also to your friends and family. It does no one good to gossip about your husband and tear him down to his face or behind his back. Make it a point daily to say something kind to your husband. (Maybe that he looks nice, you appreciate him doing something for you, etc)

4. God, Husband, then Kids (Colossians 3:18-21) - In that order. If you are a Christian then God should be first in your life. After him should be your husband and then your kids. I imagine some people probably disagree with this. However, in order to be able to parent together well your marriage must be first. Also, once your children are grown and on their own it will just be you and your husband again. You want to be able to still have a marriage, a best friend, when no one else is there. If you make your children first priority over your husband, its going to be awful lonely when they are gone. (This is not to say that you don't take care of your kids by any means! I just mean take the time to spend time with your husband and invest in your marriage.)

5. Show Him Love & Affection (1 Corinthians 7:3-5) - One of the greatest gifts God has given us as husband and wife is the opportunity to be intimate with one another and on a regular basis. It's SO important to understand and appreciate how your spouse views intimacy in order to make it both enjoyable and beneficial for you both. It's often something that couples have trouble talking about, but take the time to do so. Although when we hear intimacy when typically think physical intimacy, it's also important to be intimate by just spending real quality time together (with no distractions). Communicate and talk about your feelings, ideas and dreams together. Read some verses in the bible and pray together. Schedule regular date nights and offer to do things your husband enjoys doing.

6. Let Him Lead (Ephesians 5:22-24) - It's often hard for us to let our husbands lead us and our family whether it be spiritually, with parenting, budgeting, etc. However, God calls us to be submissive to our husbands and let them lead us. Pray God would give your husband wisdom on how to lead and you encouragement to let him. Encourage him when he is making great choices and ask how you can support him.

7. Be Willing to Forgive (Ephesians 4:32) - Our husbands deserve forgiveness just like we do. Whether it be because he left his clothes in the floor again or he said something he shouldn't have. Forgiveness is the only way to keep resentment from building in your marriage. Ask God to help you forgive your spouse on a daily basis.

8.  Fight Well & Talk it Out (Proverbs 15:1) - When we are arguing with our spouse the first thing we want to do is get defensive and prove we are right. What if instead, you really take a minute to try and understand why your spouse is angry with you. I am good at apologizing to my husband, but not talking it out. I have realized that the only way we are going to get things to change for next time is if we talk it out, respect the other ones feelings and be willing to change ourselves too.

9. Divorce is not an option. (Matthew 19:3-6) -You said "for better or for worse" on your wedding day. God brought two individuals together and made them one. Therefore, the only one who should make you two individuals again is God (Til death do you part). With God's help He wants you to have an awesome marriage and one that will bring glory to Him. If you have been divorced in the past, then allow God to forgive you and make your new marriage one worth fighting for.

10. Choose to LOVE. (Proverbs 31: 10-12) - This goes along with #9. You may think you are no longer in love with your husband, but love him anyway. You may think you are not attracted him anymore, but love him anyway. Of course there are going to be bad times, that's why we said our vows. Choose to love him anyway, because your marriage is worth it and your husband is worth it!


BONUS: PRAY FOR HIM!! Today is December 1st. Take the time each day this month to pray for your husband. Use this LIST, if you wish, as a guide to have something specific to pray for him about each day.

Hopefully in the near future my hubby will be writing a post on how husbands can love their wives even better! Stay tuned...

Tuesday, November 26, 2013

Book Page Christmas Tree

I love old books so have been trying to find lots of ways to use them. For fall, I posted how I made a book page pumpkin. This time, it's a Christmas tree! 


Here is what you need for this project:

Old book
Small pot
Bamboo skewer
Floral foam
Ribbon
Floral moss
Hot glue gun

1. Tear off the cover of the book. 
2. Cut your pages in various sizes of squares. You will want several more of the largest size square. 
3. Find a small pot, or I found these cute galvanized tubs at a yard sale.  
4. Place a piece of floral foam in the bottom of your pot so it fits snug.
5. Cover the top of the foam with floral moss, hot gluing it around the inside edge of the pot.
6. Place your skewer in the foam and start poking your book pages onto it starting with the larger pieces first.  
7. Add a little something to the top of your tree and that's it! 

Mine turned out to be about a foot tall.


Thursday, November 21, 2013

DIY Sweater Pillows

I am loving my new sewing machine! Yesterday I tackled some sweater pillows. I ran to the thrift store up town and grabbed several sweaters for a quarter each. I also found a few pillows cheap so snatched those up too to use the stuffing out of them. 


First, I cut a square out of the middle of the sweater and sewed up three sides. 


Next, I stuffed it and sewed up the top.


While browsing through the dollar section at Target, I found these burlap bows. I hand sewed it onto the pillow.


This turned out to be my favorite, so I kept this one. I made several more though that I am selling on my Thrifty 31 facebook page, if you are interested! What shall I sew next?!


Wednesday, November 20, 2013

The Stockings Were Hung...

In an earlier post, I talked about these burlap stockings I made. They are far from perfect, but I still love how they turned out! 

I had seen on Pinterest where someone hung them on an old wooden ladder. I thought this was the perfect idea for the rustic look I was wanting.


The ribbon on the wreath is red burlap and I found a roll of it in the Christmas section at Dollar General!

Can't wait to fill up those stockings!


Wednesday, November 13, 2013

Cookies & Milk for Santa

I couldn't wait any longer...the Christmas tree and other decorations are up! I just love the Christmas season and want to enjoy it as long as possible! My hubby likes to wait until after Thanksgiving, but since yesterday was our anniversary, I convinced him otherwise ;)

Speaking of anniversary, yesterday was we celebrated to wonderful years together as husband and wife! I am so blessed by him. 


I decided this year to put a chair next to the Christmas tree for "Santa". I added a plate for cookies, a milk pitcher and glass for milk. You could also add some (fake) salt dough cookies for looks, but I was afraid our dog would want to eat them.


I love these stripped straws I got at Hobby Lobby!

More Christmas decor to come in another post! 

Sunday, November 10, 2013

Burlap Christmas Stockings

I've been wanting some burlap stockings for the past couple of years. However, the ones I have seen on Etsy can run anywhere from $10.00 to over $20 a piece! Yikes! Derrick's grandma had an extra sewing machine laying around that she gave me this past week. I knew the first project I wanted to tackle was some DIY burlap stockings!

I found this tutorial and free pattern HERE. I followed the directions pretty closely, but used a plain white sheet I had for the lining instead of interfacing. It worked just fine for me. I put some buttons on the hubby's, lace on mine and a felt bone for the puppy. I used twine to hang them with. They definitely aren't perfect, but I'm pretty proud for it being my first project!


Do you have any holiday projects going on over at your house? Feel free to share your ideas!

Friday, November 1, 2013

Chocolate Chip Cookies for Two

Yesterday was Halloween and we spent a night in eating a yummy dinner and catching up on an episode of Once Upon a Time we had missed. Does anyone else love this show?! It was perfect for a rainy, spooky, Halloween night!


One of the things I made for Halloween was two giant chocolate chip cookies. This recipe only makes two cookies which is great because then you don't have tons of leftovers that are tempting you! 


Cookies for Two
2 Tbs butter
2 Tbs brown sugar
1 Tbs white sugar
Pinch of salt
1/4 tsp. vanilla
1 egg yolk (the yellow part)
1/4 tsp. baking soda
1/4 cup flour
3 Tbs. chocolate chips

1. Preheat oven to 350 degrees.
2. Put butter and microwave for a few seconds to soften. Then cream together with sugars.
3. Add salt, vanilla and egg yolk to sugar mixture and mix well.
4. Add baking soda, flour and chocolate chips to mixture and mix well.
5. Place two cookie mounds onto ungreased baking sheet (far apart so they have room expand while baking).
6. Bake for 8 minutes or until done.
7. I added some eyeballs and spiders to make it more festive. 

Wednesday, October 30, 2013

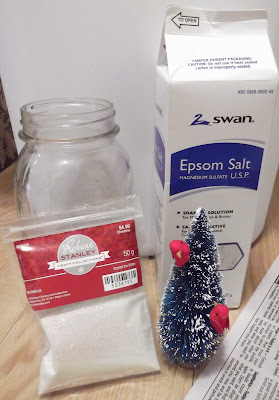
Mason Jar Snow Globes

These little things are all over Pinterest and blog land so I decided to try it myself! I just love how the sun shines through the jars...looks like a winter wonderland! 


What you'll need:
Epsom salt (or fake snow from Hobby Lobby)
Clear glitter
Mason jar (I used pint size)
Minitature trees (Doll section at Hobby Lobby)
Minuture red birds (doll section at Hobby Lobby)
Hot glue gun 
Baker's twine or ribbon (optional)

** I've seen people use water in these globes, but that wouldn't work with my birds and I've heard the green from the trees will eventually make the water turn color anyway. 


Directions: 
1. First hot glue or super glue the birds to the tree.
2. Hot glue the tree to the bottom of the lid.
3. Put some epsom salt and glitter in the jar.
4. Put your lid on and turn over so all the "snow" falls to the top of jar.
5. Tie some ribbon or twine around the jar, if desired.


Ah, I just love how they turned out! Will make great gifts this Christmas!